

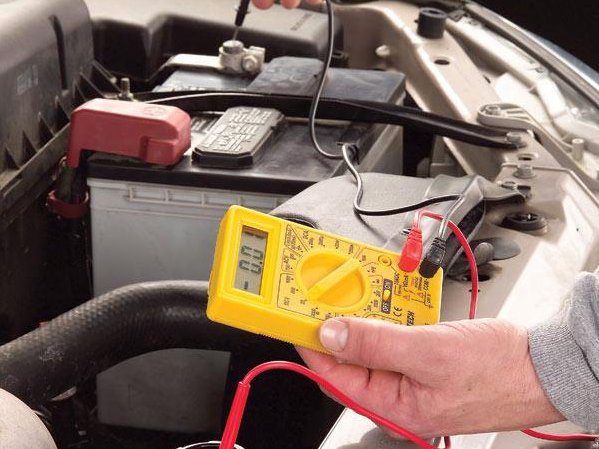
To test the ground in a car with a multimeter, follow these steps: Turn off the car’s power, select the resistance function on the multimeter, touch one probe to a metal part of the car, and touch the other probe to the ground terminal on the car’s battery. When testing the ground in a car using a multimeter, it is important to ensure the car’s power is turned off to prevent any electrical accidents.
One can then proceed by selecting the resistance function on the multimeter and using one probe to make contact with a metal part of the car. The other probe should be touched to the ground terminal on the car’s battery.
This will help determine if there is a proper connection with the ground, allowing for better car performance and safety.
:max_bytes(150000):strip_icc()/how-to-use-a-multimeter-5194980-01-acb6dc0e02254358b597206a4b1ba48e.jpg)
Credit: www.thespruce.com
Step 1: Preparation
To test the ground in a car using a multimeter, start by preparing the necessary tools and ensuring safety precautions are in place. This step is crucial in ensuring accurate and reliable results.
Gathering The Necessary Materials
Before starting the process of testing the ground in your car with a multimeter, it’s important to gather all the necessary materials. These materials will ensure you have a smooth and efficient testing process. Here’s a list of items you will need:- A digital multimeter: This is the main tool you’ll be using to measure the electrical connections in your car. Make sure your multimeter is in good working condition.
- Safety gloves and goggles: Safety should always be a priority when working with electronic components. Protect your hands with gloves and your eyes with goggles.
- A cable or wire with alligator clips: This will allow you to easily connect the multimeter to the ground point in your car.
Turning Off The Ignition
To safely test the ground in your car, you need to ensure that the ignition is turned off. This will prevent any accidental electrical discharge and keep you safe during the testing process. Follow these steps to turn off the ignition:- Locate the ignition switch in your car. It’s usually located on the dashboard or steering column.
- Turn the ignition switch to the “Off” position. This will shut down the engine and cut off the power supply to the electrical systems.
- Wait for a few minutes to allow any residual power to dissipate before proceeding with the testing.
Choosing The Appropriate Ground Point
Once you’ve gathered the necessary materials and turned off the ignition, it’s time to choose the appropriate ground point for testing. The ground point refers to a location in your car where the electrical circuit is connected to the vehicle’s chassis. Here’s how you can choose the right ground point:- Refer to your car’s manual or seek guidance online to locate the recommended ground point. This can differ depending on the make and model of your car.
- Inspect the ground point visually to ensure there are no visible damages or loose connections.
- Make sure the chosen ground point is easily accessible and convenient for connecting the multimeter’s cable or wire.
Credit: www.readersdigest.ca
Step 2: Testing Ground With A Multimeter
After setting up your multimeter correctly, the next step is to test the ground in your car using the multimeter. This step is crucial to ensure that your car’s electrical system is functioning properly and safely. By testing the ground, you can identify any potential issues such as poor connections or faulty wiring, allowing you to take the necessary steps to fix them.
Setting Up The Multimeter
Before you can begin testing the ground, you need to set up your multimeter properly. Here are the steps:
- Turn off the car: Make sure your car’s engine is turned off before proceeding with the testing to avoid any accidents or injuries.
- Select the voltage function: Set your multimeter to the voltage function by turning the dial to the appropriate setting. Refer to your multimeter’s user manual if you are unsure which setting to choose.
- Connect the leads: Attach the red lead to the positive terminal of your multimeter and the black lead to the negative terminal. Ensure that the probes are securely connected to the multimeter.
Measuring Voltage
Once your multimeter is set up correctly, you can proceed to measure the voltage across the ground in your car. Follow these steps:
- Locate the ground point: Identify the ground point in your car. This is typically a metal surface that is directly connected to the negative terminal of the battery or the car’s chassis.
- Prepare the multimeter: Place the black lead, or the negative lead, on the ground point you identified. Ensure that it makes good contact with the metal surface.
- Touch the positive lead: With the black lead in position, use the red lead, or the positive lead, to touch different electrical parts of your car that should be grounded, such as the engine block or any metal component.
- Note the readings: As you touch each part, observe the readings on your multimeter. A good ground will display a voltage close to zero or a very low voltage. If you encounter a voltage reading significantly above zero, it may indicate a poor or faulty ground connection that requires further investigation.
Interpreting The Multimeter Reading
The multimeter reading provides valuable information about the ground in your car. Here are a few possible interpretations:
- Zero voltage: If the multimeter reads zero voltage, it indicates a solid ground connection. This is what you would ideally want to see, as it means that your car’s electrical system is properly grounded.
- Low voltage: A low voltage reading (close to zero) is also acceptable. It suggests a good ground connection but may indicate slight resistance.
- High voltage: If the multimeter shows a significantly higher voltage reading, it suggests a poor ground connection. This could be due to corrosion, loose connections, or faulty wiring, which should be addressed to ensure the proper functioning of your car’s electrical system.
By testing the ground in your car using a multimeter, you can identify any potential issues and take the necessary steps to ensure the safety and proper functioning of your car’s electrical system.
Step 3: Troubleshooting Ground Issues
Having trouble with ground issues in your car? Learn how to test the ground using a multimeter in this easy step-by-step guide. Ensure a smooth and safe ride by troubleshooting and resolving ground problems efficiently.
When it comes to testing the ground in your car with a multimeter, it’s crucial to not only check for proper voltage but also to identify and resolve any ground problems that may be causing issues in your vehicle’s electrical system. In this step, we will explore the process of troubleshooting ground issues and ensuring a proper ground connection.
Identifying And Resolving Ground Problems
If you are experiencing electrical problems in your car, such as flickering lights or malfunctioning electronics, it is essential to determine whether the issue is related to a faulty ground connection. By following these steps, you can identify and resolve ground problems:
- Inspect the grounds: Start by visually inspecting the ground connections in your car. Look for any loose, corroded, or damaged wires or terminals. Tighten any loose connections and replace any damaged components.
- Perform a continuity test: Use your multimeter to check the continuity between the ground terminal and the ground point. Set the multimeter to the continuity or resistance mode, touch one probe to the ground terminal and the other probe to the ground point. If the multimeter displays a low resistance or beeps, it indicates a good ground connection. If there is no continuity or a high resistance reading, you may have a ground problem.
- Trace the ground path: If you have identified a faulty ground connection, trace the ground path to locate the issue. Follow the ground wire from the component back to the ground point, checking for any breaks, loose connections, or faulty wiring along the way. Repair or replace any damaged or faulty components.
- Ensure proper grounding: It’s crucial to ensure that all ground connections are properly grounded. Clean any corrosion or dirt from the ground point and terminal before making the connection. Use a wire brush or sandpaper to remove any oxidation or debris and ensure a secure and conductive connection.
Ensuring Proper Ground Connection
To ensure a proper ground connection in your car, follow these steps:
- Choose a suitable ground point: Select a clean and metal surface free from paint or rust as your ground point. This can be a bolt or screw on the chassis or engine block.
- Prepare the ground point: Ensure the chosen ground point is clean and free from any debris or obstruction. Use a wire brush or sandpaper to remove any paint or rust and expose the bare metal surface.
- Connect the ground wire: Attach the ground wire securely to the ground point. Use an appropriate connector or terminal to ensure a stable and lasting connection.
- Tighten the connections: Double-check that all connections are tightened properly, using a wrench or pliers if necessary. Loose connections can cause electrical problems and hinder the grounding effectiveness.
By following these steps and ensuring a proper ground connection, you can troubleshoot ground issues in your car and maintain a reliable and efficient electrical system. Remember to take proper safety precautions when working with electrical components and consult a professional if you are unsure about any aspect of the troubleshooting process.

Credit: www.amazon.com
Conclusion
To recap, testing the ground in a car with a multimeter is an essential step in diagnosing electrical issues. By following the simple steps outlined in this blog post, you can easily determine if there is proper grounding or if there is a potential problem.
Remember to always prioritize safety and take necessary precautions. With the help of a multimeter, troubleshooting electrical problems in your car becomes much simpler and efficient. Start testing your car’s ground today and ensure a well-functioning electrical system.
