When you hear that grinding sound every time you brake, it’s more than annoying—it’s a warning. I remember the first time my brakes squealed so loudly I embarrassed myself in front of a coffee shop line. That day, I realized learning how to change the brake pads on a car wasn’t just about saving money; it was about safety. It’s not as scary as it sounds, and a few hands-on tips can make the process smooth, even if you’ve never touched a wrench before.
To change brake pads, first gather all tools: jack, jack stands, lug wrench, C-clamp, and new pads. Loosen lug nuts, lift the car, and remove wheels. Detach caliper bolts, slide out old pads, and compress the caliper piston. Insert new pads, secure the caliper, reinstall wheels, lower the car, and torque lug nuts properly. Test brakes carefully before driving. Check fluid levels and ensure pads sit flush against the rotor.
Gathering Tools and Preparing Your Space
Before diving in, make sure your garage or driveway is ready. I’ve learned the hard way that starting without enough light or space turns a simple task into a frustrating marathon. Clear around the car, grab a sturdy jack and jack stands, and make sure your lug wrench fits snugly on your wheels. Don’t forget gloves and safety glasses; tiny metal shards from old pads love to fly unexpectedly.
Next, gather all replacement brake pads and any small tools like a C-clamp or socket set. Using the right tools is crucial—an ill-fitting socket can round a bolt, and a weak jack is dangerous. I keep a small tray to hold bolts and clips so they don’t roll under the car. This sounds minor, but trust me, it saves a lot of stress later.
Lastly, give your rotors a quick look. If they are deeply grooved or rusty, consider having them resurfaced or replaced. Working on worn rotors without noticing them can make your new pads feel uneven and squeaky. Taking these prep steps may take ten extra minutes, but it’s worth the time for a smoother, safer brake job.
- Clear workspace and ensure safety gear
- Gather all necessary tools and replacement parts
- Inspect rotors and pre-check bolts
Lifting the Car and Removing the Wheels
The first real move is to lift your car safely. Position the jack under the manufacturer’s recommended lift points—usually noted in your manual. I always double-check because one slip can ruin your day or worse. Once lifted, secure jack stands. Never rely solely on the jack. I once ignored this, and it gave me the fright of my life when the car shifted slightly.
Loosen your lug nuts before lifting if you haven’t done so. It’s easier than trying to twist them while the wheel spins in the air. Once the car is elevated and stable, remove the lug nuts completely and set them in a small container. Gently pull the wheel off. If it’s stuck, a few firm taps with your palm on the hub usually loosens it.
Inspect the wheel hub while it’s exposed. Clean any dirt, debris, or rust that could interfere with the new pads. I keep a wire brush handy because a smooth surface ensures proper pad contact. This small extra step prevents that irritating squeal when you first test your brakes after replacement.
- Position jack and use stands safely
- Loosen lug nuts and remove wheels
- Clean wheel hub and inspect for debris
Removing the Old Brake Pads
With wheels off, the brake caliper is front and center. I remember nervously handling mine, fearing it would fall or break. Start by removing the caliper bolts. They’re usually on the back and can be stubborn. A penetrating oil helps if they’re rusty. Once loose, carefully lift the caliper without letting it hang from the brake line—support it with a hook or bungee cord.
Sliding the old pads out is straightforward but requires attention. Look at how they sit in the caliper bracket and note the orientation. Many beginners forget this and insert new pads backward. Use this time to inspect the pads’ thickness and any uneven wear—it tells a story about your brakes’ past. Cleaning the bracket with a wire brush ensures the new pads slide in smoothly.
This is also a good moment to check for any fluid leaks or damage to the caliper. I’ve often found that pads wear unevenly when calipers stick. Addressing that now saves future headaches. Small, careful actions here make a big difference in performance and longevity.
- Remove caliper bolts carefully
- Support caliper to prevent strain on the brake line
- Slide out old pads and clean bracket
Installing the New Brake Pads
Installing new pads is a satisfying step. Apply a thin layer of brake grease to the contact points where pads touch the caliper. This prevents squeaking and ensures smooth movement. Use your notes from removal to slide the pads into the correct orientation. They should fit snugly but not require brute force. I’ve learned that forcing pads can damage both the pad and rotor.
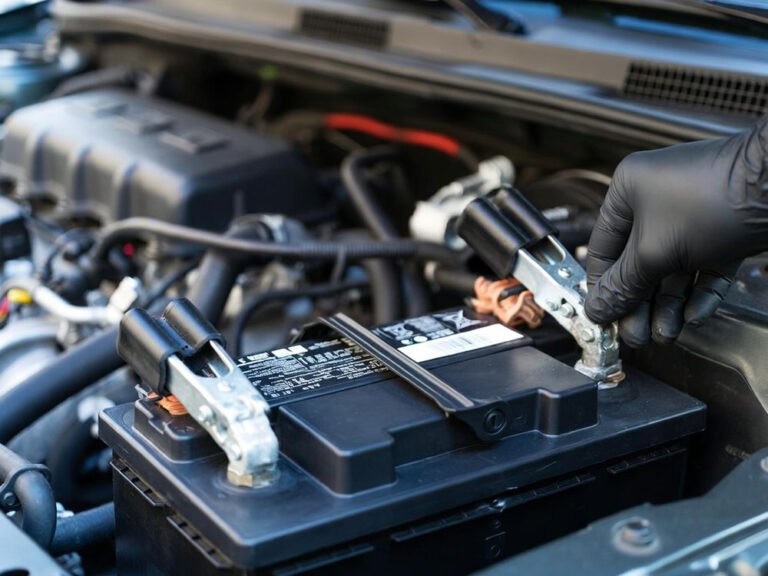
Next, compress the caliper piston. A C-clamp works perfectly here. Place one pad over the piston and gently tighten until it retracts fully. Take it slow; rushing can bend the piston or leak fluid. Once the piston is retracted, carefully position the caliper back over the new pads and bolt it down securely. Double-check that bolts are tight but not over-torqued.
Finally, give the pads a little wiggle to make sure they sit flush and move freely. A stuck pad can cause uneven wear or squeaking. This step is subtle, but paying attention now prevents annoying noises and ensures your brakes feel solid from the first press.
- Apply brake grease to contact points
- Compress caliper piston slowly
- Fit new pads and secure caliper
Reassembling Wheels and Lowering the Car
After the pads are in, it’s time to put your wheels back. Place the wheel on the hub, hand-tighten lug nuts in a star pattern to ensure even pressure, then carefully lower the car. I’ve seen people rush and strip threads by tightening unevenly. Taking the time to follow a star pattern saves frustration.
Once the car is on the ground, fully torque the lug nuts to manufacturer specifications. A torque wrench is invaluable here; it guarantees safety without over-tightening. Step back and visually inspect the wheels and caliper bolts, confirming everything looks stable. I often give the wheel a gentle wiggle to ensure nothing feels loose.
Finally, pump your brake pedal a few times. This moves the caliper pistons back into proper position and ensures the brake pedal feels firm. You’ll notice the car stops smoothly, and that first squeal-free test drive always feels rewarding. Small steps like these separate a confident DIYer from someone who ends up calling a shop.
- Hand-tighten lug nuts in a star pattern
- Lower car and torque nuts correctly
- Pump brakes and check stability
Testing Brakes and Final Adjustments
After installation, testing is crucial. Start slow in an empty driveway or quiet street. Press the brake pedal gently, feeling for firmness and consistent stopping power. Any pulsing, grinding, or unusual noises means something wasn’t installed correctly. I always recommend driving a short distance, then rechecking caliper bolts and pad fit.
Check brake fluid levels afterward. Compressing the pistons sometimes pushes fluid back into the reservoir, and topping off prevents low-level issues. If your car has an anti-lock braking system, a quick test around the block ensures it’s responding properly. Listen carefully; brakes should be smooth and quiet, not squeaky or dragging.
Remember, patience is key. The first few stops after replacing pads might feel slightly different, and that’s normal. Avoid high-speed stops until you’re confident everything is seated. Over time, the new pads will bed in and deliver strong, reliable braking. That quiet, confident stop is incredibly satisfying.
- Test brakes gently in a safe area
- Check fluid levels after compression
- Recheck bolts and listen for unusual noises
Final Thoughts
Replacing brake pads may feel intimidating at first, but taking it slow, being organized, and paying attention to small details makes it manageable. Every careful action—from compressing pistons to torquing lug nuts—directly impacts safety and comfort. With practice, this task becomes straightforward, cost-effective, and even satisfying. Once done, you’ll enjoy quiet, reliable braking and the confidence of knowing you did it yourself.
| Action | Details | Tips & Warnings |
|---|---|---|
| Gather tools | Jack, jack stands, lug wrench, C-clamp, new pads | Keep bolts and small parts in a tray |
| Lift car | Position jack at manufacturer lift points | Always use jack stands |
| Remove wheels | Loosen lug nuts first, then lift | Tap stuck wheels gently if needed |
| Remove caliper | Unscrew bolts, support caliper | Never let it hang from the brake line |
| Remove old pads | Slide out carefully, note orientation | Clean caliper bracket with wire brush |
| Install new pads | Apply grease, compress piston, fit pads | Ensure snug, correct orientation |
| Reassemble wheels | Hand-tighten in star pattern, lower car | Torque nuts to spec |
| Test brakes | Drive slowly, check pedal firmness | Pump brake pedal before first stop |
Frequently Asked Questions (FAQs)
Is it safe to change brake pads at home?
Yes, changing brake pads at home is safe if you follow proper safety precautions. Use a flat surface, a sturdy jack and jack stands, and wear gloves and safety glasses. Never rely solely on a jack to hold the car. Take your time with every step, from removing calipers to reinstalling wheels, and double-check bolts and fluid levels. If anything feels uncertain, it’s better to pause and review the manual or consult an experienced friend.
Can I reuse old brake pads?
Reusing old brake pads is generally not recommended. Pads wear down unevenly and may have cracks, glazing, or contamination from dirt and oil. Installing new pads ensures consistent stopping power and reduces the risk of noise or damage to your rotors. Occasionally, if pads are barely used and in perfect shape, they can be reused temporarily, but it’s safer and more effective to replace them whenever rotors are exposed.
Do I need to replace rotors with new brake pads?
Not always. Rotors only need replacement if they’re warped, deeply scored, or below minimum thickness. You can often resurface lightly worn rotors. Check carefully for grooves or uneven wear. Replacing pads on damaged rotors can cause squealing or uneven braking. Using a dial indicator or consulting a professional helps determine if rotor replacement is necessary.
Is it necessary to lubricate brake pad contact points?
Yes, lubricating the contact points prevents squeaking and ensures smooth pad movement. Apply a thin layer of brake grease to the edges where pads touch the caliper bracket. Avoid putting grease on the pad surface or rotor; that would reduce braking efficiency. Proper lubrication extends pad life and reduces annoying noise during braking.
Can I change brake pads without a C-clamp?
Technically, yes, but a C-clamp makes compressing the caliper piston much easier. Alternatives include a large adjustable wrench or a dedicated piston tool. Using a C-clamp provides controlled, even pressure and reduces the risk of damaging the piston or brake lines. It’s a small investment that makes the job smoother.
Do I need to pump the brakes after replacing pads?
Yes, always pump the brake pedal after installing new pads. This moves the caliper pistons into proper position and restores normal brake pressure. Without this step, the pedal may feel soft, and braking performance could be compromised. Press gently until the pedal feels firm before driving.
Is it normal for new brakes to squeak?
Some initial squeak is normal due to bedding in. Pads need a few stops to conform perfectly to the rotor surface. However, persistent squealing may indicate improper installation, lack of lubrication, or contaminated pads. Ensure contact points are greased and that pads sit flush. Bedding them correctly eliminates most early noise.
Can I replace only the front or rear brake pads?
Yes, you can replace front or rear pads separately, but it’s often recommended to replace both sides on the same axle to maintain even braking. Uneven pad wear can lead to pulling to one side or reduced stopping power. Always check fluid levels and test brakes carefully after partial replacement.