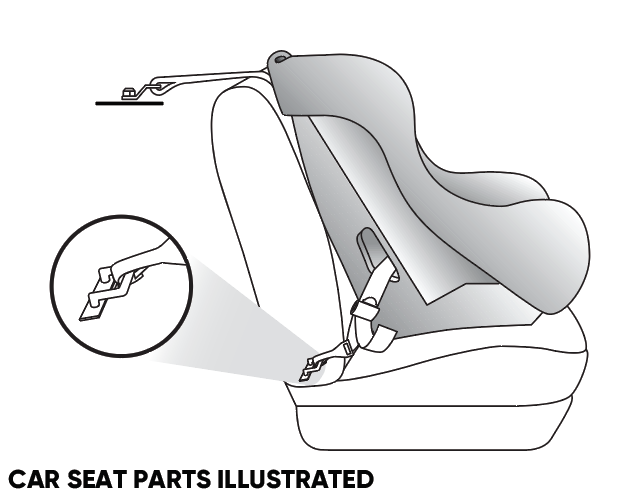
To install a Diono car seat, follow the manufacturer’s instructions for proper installation. The Diono car seat is a popular choice among parents for its safety features and durability.
Installing the car seat correctly is crucial to ensure your child’s safety while traveling. In this guide, we will discuss the necessary steps to install a Diono car seat properly. By following these instructions, you can have peace of mind knowing that your child is secure during each journey.
So, let’s get started with the installation process.
Credit: diono.com
Step 2: Prepare The Car Seat
Once you have gathered all the necessary tools and read the instruction manual, it’s time to prepare your Diono car seat for installation. Follow these simple steps to ensure proper preparation:
Clean The Car Seat
Before installing the car seat, it’s essential to ensure that it is clean and free from any debris. Follow these steps to clean your Diono car seat:
- Start by removing the car seat cover, if possible. Check the instruction manual for specific guidance on how to remove the cover.
- Once the cover is removed, inspect it for any signs of damage or wear. If necessary, clean the cover according to the manufacturer’s instructions. This will help maintain the seat’s integrity and extend its lifespan.
- Next, inspect the shell of the car seat for any dirt, crumbs, or other debris. Use a damp cloth or vacuum to gently remove any particles.
- Pay close attention to the crevices and corners where dirt can accumulate. A small brush or toothbrush can be useful for reaching those hard-to-reach areas.
- Ensure that all the components, such as the straps and buckles, are clean and in good working condition. If any parts are damaged or malfunctioning, contact Diono customer support for assistance.
Adjust The Straps
Properly adjusted straps are vital for the safety and comfort of your child. Follow these steps to adjust the straps of your Diono car seat:
- Make sure the car seat is positioned correctly in your vehicle, according to the manufacturer’s guidelines.
- Check the harness height adjustment mechanism on the back of the car seat. This allows you to raise or lower the shoulder straps to the correct position for your child’s height.
- Slide the harness straps through the appropriate slots, ensuring that they are positioned at or slightly above your child’s shoulders when seated.
- Securely buckle the harness and check for proper fit. The straps should be snug but not too tight, allowing for one to two fingers to fit between the straps and your child’s body.
- Double-check that the chest clip is positioned at armpit level.
By cleaning the car seat and adjusting the straps correctly, you are now ready to move on to the next step, which is the actual installation of your Diono car seat. Stay tuned!
Credit: diono.com
Step 3: Install The Car Seat
To install your Diono car seat, follow these simple steps for a quick and secure installation. Ensure a safe ride for your child by carefully installing the car seat according to the manufacturer’s instructions.
Rear-facing Installation
Step 1: Start by checking the weight and height limits specified by the manufacturer for the rear-facing position. Diono car seats typically accommodate rear-facing installation for infants up to a specified weight and height.
Step 2: Place the car seat in the back seat of your vehicle, facing the rear. Ensure that it is securely positioned and does not wobble.
Step 3: Locate the lower anchors or seat belt for securing the car seat. Diono car seats often provide the option to install using either the lower anchors or seat belt.
Step 4: To install using the lower anchors, refer to your vehicle’s manual to locate the lower anchor points. Attach the lower anchor connectors on the car seat to the lower anchors in your vehicle. Apply firm pressure to ensure a tight and secure connection.
Step 5: If using the seat belt installation method, follow the instructions provided by Diono. Thread the seat belt through the appropriate belt path on the car seat and buckle it. Pull the seat belt tight to remove any slack.
Step 6: Confirm that the car seat is properly installed by giving it a firm tug. It should not move more than an inch in any direction.
Step 7: Adjust the recline angle of the car seat according to the manufacturer’s instructions to ensure your child’s comfort and safety.
Note: It is recommended to consult the instruction manual that comes with your Diono car seat for specific installation instructions and guidelines.
Forward-facing Installation
Step 1: Determine if your child meets the weight and height requirements for forward-facing installation. Diono car seats often provide forward-facing installation for toddlers and older children.
Step 2: Position the car seat in the back seat of your vehicle, facing forward. Make sure it is securely positioned and does not wobble.
Step 3: Locate the lower anchors or the seat belt for securing the car seat. Diono car seats typically offer both installation options for forward-facing positioning.
Step 4: To install using the lower anchors, refer to your vehicle’s manual to locate the lower anchor points. Attach the lower anchor connectors on the car seat to the lower anchors in your vehicle. Apply firm pressure to ensure a tight and secure connection.
Step 5: If using the seat belt installation method, follow the instructions provided by Diono. Thread the seat belt through the appropriate belt path on the car seat and buckle it. Pull the seat belt tight to remove any slack.
Step 6: Test the stability of the car seat by giving it a firm tug. It should not move more than an inch in any direction.
Step 7: Adjust the harness straps to ensure a snug fit on your child. The straps should be at or above your child’s shoulders for forward-facing installation.
Note: For detailed forward-facing installation instructions and guidelines, refer to the instruction manual provided with your Diono car seat.

Credit: www.nhtsa.gov
Frequently Asked Questions On How To Install Diono Car Seat
Are Diono Car Seats Hard To Install?
Diono car seats are not hard to install. They come with clear instructions and easy-to-use features. Just follow the guidelines provided, and you’ll have your car seat securely installed in no time. Enjoy a stress-free installation process with Diono car seats.
How Do You Install A Diono Rear-facing Car Seat?
To install a Diono rear-facing car seat, first, read the manufacturer’s instructions carefully. Next, locate the lower anchors or use the seat belt to secure the car seat to the vehicle’s back seat. Adjust the recline angle according to the instructions and ensure a snug fit.
Finally, double-check that the seat is properly installed before using it.
How Do You Install Diono Forward Facing With Latch?
To install the Diono car seat forward-facing with latch, follow these steps: 1. Position the car seat in the desired spot. 2. Attach the latch connectors to the vehicle’s lower anchors. 3. Tighten the straps until secure. 4. Confirm proper installation by checking for minimal movement.
5. Adjust the car seat to ensure the child fits comfortably.
How Do You Anchor A Diono Car Seat?
To anchor a Diono car seat, follow these steps: 1. Position the car seat securely on the vehicle’s seat. 2. Attach the seat’s top tether to the designated anchor point in your vehicle. 3. Secure the car seat’s lower anchors to the vehicle’s lower anchors, in accordance with the car seat and vehicle manufacturer’s instructions.
4. Ensure the seat is tightly installed by pressing firmly and checking for minimal movement. 5. Verify the installation through proper testing and adjusting as needed.
How Do You Install A Diono Car Seat?
To install a Diono car seat, start by reading the instruction manual carefully and following the step-by-step instructions provided. Properly secure the car seat using the vehicle’s seat belt or LATCH system, making sure it is snug and does not move more than an inch in any direction.
Can A Diono Car Seat Be Installed With A Seat Belt?
Yes, a Diono car seat can be installed using the vehicle’s seat belt. Follow the specific instructions in the user manual for proper seat belt installation, ensuring that the seat belt is securely locked and the car seat is tightly held in place.
Conclusion
Installing a Diono car seat is a crucial step to ensure your child’s safety on the road. By following the step-by-step instructions provided, you can confidently install the car seat without any difficulties. Remember to double-check the installation to guarantee a secure fit.
Your child’s safety should always be a top priority, and with the proper installation of a Diono car seat, you can travel with peace of mind.


